Imagine you’re out in the woods, surrounded by majestic trees and the smell of fresh pine fills the air. You’re ready to start cutting some logs with your trusty chainsaw, only to realize the chain is duller than a butter knife. Oh no, what do you do now?
Well, fear not my friend, because I’m here to tell you about a life-saving tool that will make sharpening your chainsaw a breeze – the Dremel!
Now, you might be thinking to yourself, “What the heck is a Dremel?” Is it some kind of magic wand that will miraculously transform my chainsaw into a super-sharp cutting machine?
Well, not exactly. The Dremel (Check Price on Amazon) is a handheld rotary tool perfect for sharpening the teeth on your chainsaw’s chain. And let me tell you, it’s a game-changer.
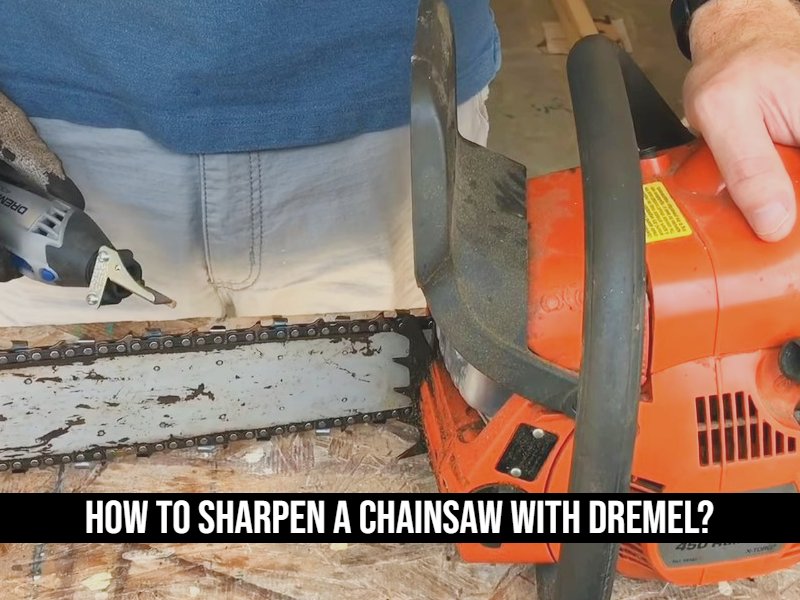
How to Sharpen a Chainsaw with Dremel?
A chainsaw is an essential tool for any homeowner or professional who needs to cut wood. As with any tool, it’s important to keep your chainsaw in good working order to ensure it continues to function properly.
Sharpening the chainsaw chain is an essential step in maintaining your saw. One way to sharpen your chainsaw is by using a Dremel tool.
Here is a step-by-step guide on how to sharpen a chainsaw with a Dremel.
Step 1 – Opting for the Appropriate Chainsaw to Suit the Task
To commence the process of sharpening your chainsaw using a Dremel, it is imperative to ensure that you possess the correct chainsaw tailored to the specific undertaking at hand.
The size of the chainsaw required will hinge upon the dimensions of the wood you intend to cut. For smaller tasks, a diminutive chainsaw is called for, whereas more extensive projects necessitate a larger chainsaw.
Step 2 – Thoroughly Examine the Chain and Bar for Damage or Wear
Before embarking on the sharpening procedure, conduct a meticulous inspection of the chain and bar of your chainsaw to identify any indications of damage or wear.
Should the chain exhibit significant damage, it might necessitate replacement. Scrutinize the bar thoroughly, paying close attention to any bends or cracks. Should any form of damage be detected, it becomes imperative to replace either the chain or the bar before proceeding further.
Step 3 – Detaching the Bar from the Chainsaw

To effectively sharpen the chainsaw chain, it becomes necessary to detach the bar from the chainsaw. Loosen the bolts that secure the bar in place and cautiously remove it. Ensure that you keep track of each component that you remove, enabling easy reassembly of the saw at a later stage.
Step 4 – Utilizing a Dremel to Sharpen the Chain
Presently, it is time to employ a Dremel tool to sharpen the chainsaw chain. The Dremel should be equipped with a grinding stone that matches the size of the chainsaw teeth.
Hold the Dremel perpendicular to the tooth and proceed to grind the tooth back and forth until all burrs or nicks have been eliminated. Proceed to the subsequent tooth and repeat the process until all teeth have been sharpened.
Step 5- Clearing the Chain Groove of Debris
After successfully sharpening the chainsaw chain, it is of utmost importance to rid the chain groove of any accumulated debris. Utilize a small brush to meticulously eliminate any sawdust or debris that may have wedged itself within the groove.
Step 6 – Applying Lubrication to the Chain Groove
To guarantee the smooth operation of your chainsaw, it is crucial to apply a lubricant to the chain groove. This will reduce friction and prevent the chain from overheating. Administer a small amount of oil to the chain groove, ensuring to wipe away any excess.
Step 7 – Reattaching the Chainsaw Bar

It is now time to reattach the bar to your chainsaw. Exercise caution as you align the bar precisely with the chainsaw, ensuring that the chain fits snugly into the groove. Securely tighten all screws and bolts, being mindful not to over-tighten.
Step 8 – Verifying Proper Chain Tension
Before initiating the operation of your chainsaw, it is crucial to assess the tension of the chain. Pull the chain away from the bar and confirm that there is a slight amount of slack. If the chain is overly taut, it may cause damage to the chainsaw.
Step 9 – Starting the Chainsaw and Conducting a Test
Prior to commencing your chainsaw and subjecting it to a test, double-check the chain tension. The chain should rotate smoothly, and the saw should effectively cut through wood. If any issues arise, it may be necessary to sharpen the chain once more.
Step 10 – Regular Maintenance of Your Chainsaw
Regular maintenance is paramount to keep your chainsaw in optimal working condition. This entails periodic chain sharpening, thorough cleaning of the chain grooves, and regular application of lubrication.
By upholding these maintenance practices, your chainsaw will always be prepared to tackle any task you present it with.
Safety Precautions when sharpening a chainsaw with a Dremel
Sharpening your chainsaw using a Dremel can be a swift and effective method to maintain its peak performance. However, it is essential to prioritize safety to prevent any untoward incidents.
Let’s go through the necessary steps to ensure a safe sharpening process

1. Prioritize Personal Protection – Safeguard yourself by wearing essential protective gear such as eye protection, gloves, and earplugs. The loud noise emitted by chainsaws can be detrimental to your hearing, and potential debris can pose risks to your eyes. Wearing gloves is vital to shield your fingers from the sharp teeth of the chainsaw.
2. Secure the Chainsaw – Before commencing the sharpening procedure, confirm that the chainsaw is powered off and unplugged. Additionally, ensure the chainsaw is securely fastened in a clamp or vice to maintain stability throughout the sharpening process.
3. Position the Dremel Correctly – Position the Dremel tool at a precise right angle to the chainsaw teeth. Employ light touches and gentle movements while sharpening to prevent overheating or causing any damage to the teeth.
4. Utilize a Guide – Employing a guide can be immensely helpful in maintaining the appropriate angle and preventing the Dremel from slipping or inadvertently causing damage to the chainsaw. It is recommended to carefully follow the manufacturer’s instructions when using a guide for optimal results.
5. Check for balance – After sharpening, check the balance of the chainsaw by hanging it from a nail or screwdriver. If one side is heavier than the other, use the Dremel to remove a bit of material from the heavier side.
Is it worth sharpening a chainsaw with Dremel?
Maintaining your chainsaw is of utmost importance if you desire optimal performance and longevity from your trusted tool.
Among the tools commonly used for chainsaw sharpening is the versatile Dremel, a handheld rotary tool renowned for its multifaceted applications. However, several factors should be considered before opting for the Dremel as your go-to chainsaw sharpening tool.
To begin with, it is crucial to assess the compatibility between the Dremel tool size and the chainsaw blade size. If the chainsaw blade exceeds the capacity of the Dremel tool, utilizing this tool for sharpening might not yield the most efficient results.
Moreover, heavily worn-out blades may necessitate the use of more robust sharpening tools better suited for the task.
Achieving the optimal angle and sharpness during chainsaw sharpening with a Dremel requires a certain level of skill from the user. It is essential to take into account the user’s proficiency and experience, as achieving the same level of sharpness as with a traditional chainsaw file may not be attainable for an inexperienced user.
Pros and cons of sharpening a chainsaw with Dremel

Sharpening a chainsaw with a Dremel brings both advantages and disadvantages to the table. The Dremel, known for its versatility, serves a myriad of purposes, including chainsaw sharpening. Let’s explore the pros and cons of using a Dremel for this task:
Pros:
Versatility at Its Finest – Standing out among an array of tools, the Dremel tool boasts remarkable versatility, excelling in multitasking abilities. Among its many remarkable applications is the effortless sharpening of chainsaws. With a Dremel tool, you gain access to a unique solution that enables the sharpening of both the cutters and the depth gauges of the chainsaw.
Time Efficiency – Chainsaw sharpening can often prove laborious and time-consuming. However, the utilization of a Dremel tool significantly reduces the time and effort required to complete the task. The tool’s exceptional speed and efficiency transform the sharpening process into a time-saving technique, outshining the traditional manual approach.
Precision Perfected – For those who prioritize precision and accuracy in their sharpening endeavors, the Dremel tool emerges as the ideal choice. Its unparalleled precision and impeccable control simplify the process of sharpening each cutter to the exact angle and length required. Opting for a Dremel tool ensures an accurate and flawlessly executed sharpening job.
Cons:
Pricey Predicament – It’s important to acknowledge that Dremel tools can be deemed cost-prohibitive, especially when additional attachments are required for sharpening various parts of the chainsaw. The tool’s cost may pose a hindrance to some users, particularly those who seldom utilize it.
I am Senior Editor and CEO and I have been a chainsaw enthusiast for over 12 years. As a passionate chainsaw enthusiast, I have got a wealth of knowledge and experience with chainsaws, and I am constantly striving to expand my expertise and knowledge. Read More!